
Scalable Angular app architecture
This article is a collection of my knowledge about building robust and scalable front-end applications in Angular. First part presents the concepts which I've found are worth adopting when developing front-end applications. In the second part I showcase an Angular app architecture built on top of these concepts.
Note: All code examples used in this article are simplified snippets of code from the Coffee Election app. Coffee Election app is an Angular app showcasing the scalable Angular app architecture described below. It lets its users vote for their favorite type of coffee and displays voting results. To see actual, non-simplified implementation, click on the file name above code snippets.
Contents
1. Main ideas and concepts
This section will present the patterns and main ideas used to create a robust and scalable front-end app architecture. These concepts are in my opinion current state of the art when it comes to front-end development and I use them daily when building production ready front-end apps. Although I’ll present them in the context of Angular framework, I suggest you consider adopting their slightly modified version even when developing apps using other frameworks.
1.1 State management with observable store services
Effective state management is crucial in larger front-end applications. This scalable Angular app architecture was designed with observable store services as its main way of managing state. Observable stores are a state management solution implemented using RxJS to mimic Redux architecture. I described them in depth in my previous article about State management in Angular with observable store services. I recommend that you check it out before you continue reading this article.
1.2 Component based architecture
Component based architecture has gained a lot of popularity in front-end development over the past few years. It’s a pattern that fits nicely in the context of developing front-end applications and enables developers to write maintainable and extensible code.
The scalable Angular app architecture described in this article is strongly rooted in component based architecture. The purpose of many ideas written bellow is to enhance components’ reusability which in turn makes apps easier (and way more fun) to understand and extend.
In my opinion, the most important part of creating truly reusable components is to separate them into containers and presentational components.
1.2.1 Presentational components
In the previous article about observable store services we’ve learned how to store app’s state in observable stores. To make an app useful though we would want to present this state to the users and create an interface for them to interact with the state. This is where presentational components come into play.
Presentational components are responsible for rendering the current state and providing an interface that makes it possible for the user to interact with the app. They define how the rendered state should look like in their templates and style definitions. They also setup event listeners to handle the interaction part of their responsibilities.
Let’s see how the theory of presentational components looks like in practice. We’ll first have a look at a simplified template of a coffee candidate that the users can vote for.
coffee-candidate.component.html
1
2
3
4
5
6
7
8
9
10
11
12
13
<div class="ce-coffee-candidate__name">
    <div class="ce-coffee-candidate__label">Name</div>
    <div class="ce-coffee-candidate__value">{{candidate.name}}</div>
</div>

<div class="ce-coffee-candidate__action">
    <button
        class="ce-button ce-button--primary ce-coffee-candidate__action-button"
        (click)="onUserAction.emit(UserAction.AddVote)"
    >
        Add vote
    </button>
</div>
The template above renders candidate’s name and sets up a click event handler on “Add vote” button that triggers onUserAction.emit(UserAction.AddVote). The properties and methods used are defined in component class:
1
2
3
4
5
6
7
8
9
10
11
12
13
14
@Component({
    selector: 'ce-coffee-candidate',
    templateUrl: './coffee-candidate.component.html',
    styleUrls: ['./coffee-candidate.component.scss'],
    changeDetection: ChangeDetectionStrategy.OnPush,
})
export class CoffeeCandidateComponent {
    @Input()
    candidate: Candidate;
    @Output()
    onUserAction = new EventEmitter<UserAction>();

    UserAction = UserAction; // Constants exposed to component's template
}
As you can see the component class is pretty simple. There is basically only one Input and one Output defined. And that’s the point. CoffeeCandidateComponent is only concerned with the presentation of state (passed in via inputs) and reacting to user actions by emitting events (via outputs).
In many cases presentational components need additional methods and properties in order to create more complicated user interfaces. Some examples would be:
- a
booleanpropertyisSectionVisibleused to show/hide a certain section of component’s UI, - methods to compute (from input data) some additional properties rendered in the UI,
- event handlers for more complex user interactions,
- methods to throttle or debounce user input etc.
Logic needed to implement these functionalities can be quite complex. But no matter how complex it is, it should always be concerned with just the presentation of app’s state and capturing of user actions. There should be no business logic, no direct app’s state updates, no API calls etc. in presentational components. This should be handled by observable stores or other services.
Presentational components can also include other components in their templates in order to keep their purpose as focused as possible. These additional components can be defined in presentational component’s template directly or projected from parent components into a <ng-content> tag.
What one gets by implementing this pattern of presentational components is a clear separation of concerns. Presentational components are decoupled from the app’s business logic and have no clue about app’s state structure. They define the rules (an interface) of how to communicate with them via typed inputs and outputs. And this makes presentational components truly reusable.
Good, we’ve got presentational components covered. Let’s continue and explore the other type of components we need in order to create an actual app. Presentational components are decoupled from business logic and app’s state structure, but we still need to somehow connect their inputs and outputs correctly to that business logic and app’s state. And that’s the role of smart container components.
1.2.2 Smart container components
Smart container components are components that act as a “glue” which binds observable stores and other business logic with presentational components in a loosely coupled way. They are “smart” because, in order achieve this, they must know how app’s state is structured, which stores contain the state required, which store’s method to call when an output callback is triggered by a presentational component etc. Because of that, container components are much more specific to app’s features and their reusability is lower. But that’s fine - some parts of the app must be smart so that the app can do smart things.
A container component class may look something like this (please refer to my previous article about observable store services if any of the code examples bellow don’t make sense to you):
1
2
3
4
5
6
7
8
9
10
11
12
@Component({
    templateUrl: './coffee-list.view.html',
    styleUrls: ['./coffee-list.view.scss'],
    providers: [CoffeeListStore, CoffeeListEndpoint],
})
export class CoffeeListView implements OnInit {
    constructor(public store: CoffeeListStore) {}

    ngOnInit(): void {
        this.store.init();
    }
}
Nothing too complicated. The most interesting parts are:
providers: [CoffeeListStore, CoffeeListEndpoint]which defines the services we’ll need in this component and it’s subcomponents,constructor(public store: CoffeeListStore) {}which creates a new instance of the observable store,this.store.init()which initializes the observable store.
The template of a container component is much more interesting in my opinion:
1
2
3
4
5
6
7
8
9
10
11
12
13
14
15
16
17
18
19
20
21
<ng-container *ngIf="{state$: store.state$ | async} as subs">
    <div
        class="ce-panel ce-coffee-list-view__list-item"
        *ngIf="subs.state$.requests.listCandidates.inProgress"
    >
        <div class="ce-loader ce-loader--takeover"></div>
    </div>

    <ng-container *ngIf="!subs.state$.requests.listCandidates.inProgress">
        <div
            class="ce-panel ce-coffee-list-view__list-item"
            *ngFor="let candidate of subs.state$.candidateList.candidates"
        >
            <ce-coffee-candidate
                class="ce-coffee-candidate ce-coffee-list-view__candidate"
                [candidate]="candidate"
                (onUserAction)="store.submitUserAction(candidate, $event)"
            ></ce-coffee-candidate>
        </div>
    </ng-container>
</ng-container>
The example above shows a container component “in action”. First a subs object is created whose role is to store subscriptions to different observables stores. This is an optimization so that only one subscription per store is created in a template by storing a conditional result in a variable. Otherwise, async pipe would create a new subscription for every template binding using store.state$ observable.
The next interesting part is the inclusion of a presentational component (<ce-coffee-candidate>). Notice how the container component wires correct inputs and outputs to CoffeeCandidateComponent. As I stated before, container component knows how store’s state is structured and which public methods of modifying the state exist in the store. It also knows what the interface exposed by CoffeeCandidateComponent looks like. And it knows how to connect the store to CoffeeCandidateComponent in order to add a voting feature to the app.
The best part is that the store doesn’t care who uses its state and in what way it is used. It is instead concerned with implementing the right business logic and state persistance. The store assumes a “smart” consumer knows how to use its exposed interface. Similarly CoffeeCandidateComponent presentational component isn’t concerned with where a candidate to render comes from or how to update the state when user votes for this coffee candidate.
This clear separation of concerns makes the app much easier to understand and extend with new features. And it enables data to “flow” in one direction through the app. I’ll explain this further in a minute.
There’s just one more thing left to explain in this section. You may have noticed the above container component is actually called a “view”. This isn’t a mistake.
A view is a special type of container component. It’s a smart container component which can be routed to by Angular Router. In other words, it’s a component included in the list of Routes with a path specified:
1
2
3
4
5
6
7
8
9
10
11
12
const routes: Routes = [
    {
        path: 'list',
        component: CoffeeListView,
    },
];

@NgModule({
    imports: [RouterModule.forChild(routes)],
    exports: [RouterModule],
})
export class CoffeeListRoutingModule {}
Views are quite similar to regular container components. The only difference is that views are responsible for synching query params’ state with state in app’s stores. An example will make this statement much clearer:
1
2
3
4
5
6
7
8
9
10
11
12
13
14
15
16
17
18
19
20
21
22
23
export class CoffeeListView implements OnInit, OnDestroy {
    private ngUnsubscribe$: Subject<undefined> = new Subject();

    constructor(public store: CoffeeListStore, private route: ActivatedRoute) {}

    ngOnInit(): void {
        ...
        this.subscribeToQueryParamsUpdates();
    }

    private subscribeToQueryParamsUpdates(): void {
        this.route.queryParams
            .pipe(takeUntil(this.ngUnsubscribe$))
            .subscribe(params => {
                this.store.sortCandidates(params.sort);
            });
    }

    ngOnDestroy(): void {
        this.ngUnsubscribe$.next();
        this.ngUnsubscribe$.complete();
    }
}
CoffeeListView is responsible for updating the state whenever sort query param is updated. It does this by subscribing to an observable of route’s query params (this.route.queryParams.subscribe(...)) and invoking this.store.sortCandidates when necessary.
Views should take care of doing the sync in reverse direction too. What this means is that whenever state in store is updated (and this update must be reflected in the URL), it is views that are responsible for making the new state persistent by updating the URL. In practice it looks like this:
1
2
3
4
5
6
7
8
9
this.store.state$
    .pipe(takeUntil(this.ngUnsubscribe$))
    .subscribe(state => {
        this.router.navigate(['.'], {
            queryParams: {
                sort: state.sort,
            },
        });
    });
1.3 One-way data flow
As promised a few paragraphs above, this section will explore what is a good way for data to “flow” through the app. What do I have in mind when I say data? Two things mainly:
- app’s state we would like to present to the user and
- actions’ payload needed to update app’s state upon user interaction.
One-way data flow is a great pattern to ensure state is consistent across all components making up the app. It became quite popular thanks to React. But this doesn’t mean it is only possible to use this pattern in React apps. On the contrary, I would argue that one-way data flow is a great pattern to use when developing front-end applications regardless of framework. Because data flows in one direction it’s easy to “follow” it around and get a clear picture of how the app works.
Here’s a diagram of how the one-way data flow pattern looks like when applied to the architecture I’m describing in this article:
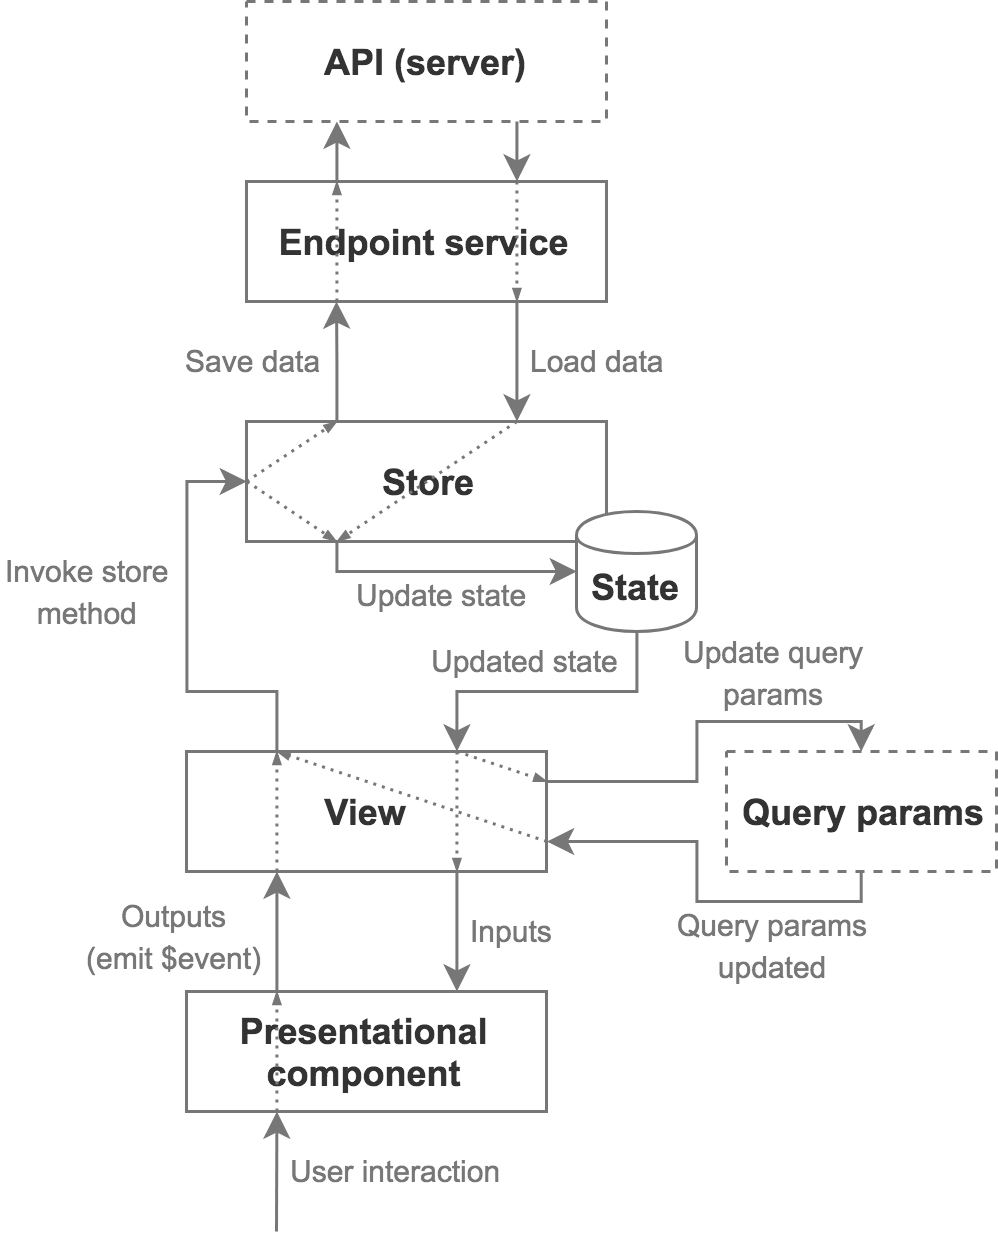
Diagram 1: One-way data flow
The diagram might look a bit intimidating at first but don’t worry, it’s actually quite simple to understand it if you follow the arrows. Here’s a breakdown of our “data journey”:
- The store first loads data from an API (more on this later). It then transforms loaded data if necessary and updates its state.
- Updated state is pushed to all subscribers (smart components or other stores) - this happens automatically since state is a RxJS observable.
- Smart components compute local state (if needed) from updated state.
- Updated state and smart components’ local state is propagated to presentational components via
@Input()bindings. - Presentational components compute local state (if needed) from inputs and re-render the state.
Upon user interaction data flows like this:
- Presentational component registers user interaction and emits an event with payload to a smart component via
@Output()binding. - Smart component reacts to emitted event by invoking store’s method with arguments computed form event’s payload.
- Store updates its state directly or sends a request to an API to make the update persistent. In this case new state is loaded from the API and stored into state after the request is complete.
- … and we’ve come full circle.
There is another version of the circle presented in the diagram. In this version presentational components are substituted with query params. There are only two differences in how data flows:
- Upon state update, view propagates updates to query params instead of presentational components.
- State updates are triggered by query params updates instead of user’s actions.
This concludes the explanation of one-way data flow. It’s not so hard too keep the state in all parts of the app consistent if data flows in one direction. There’s always just one source of truth for a particular piece of state (one of the stores) and there is only one way to update this state (via a corresponding store).
1.4 Communication with external systems
The last pattern I’ll talk about in this part of the article is about how to connect an app with external “systems”, such as server API, browser’s local storage, cookies etc. Although I’ll only provide examples of communication with servers, the two main ideas are the same for other types of external systems:
- Observable stores (or other services containing business logic) should be the only part of an app that knows about external systems.
- Observable stores should not communicate with external systems directly - a proxy service should be used to abstract away communication details.
The following examples demonstrate how these ideas translate into practice when communicating with a REST API. The proxy service in this case is called CoffeeListEndpoint and it is injected into the store as endpoint. The store uses it to reload a list of candidates on initialization.
1
2
3
4
5
6
7
8
9
10
11
12
13
14
15
16
17
18
19
20
21
22
23
24
25
26
27
28
29
30
31
32
33
34
35
36
37
38
39
40
41
42
43
44
45
46
47
48
49
50
51
52
@Injectable()
export class CoffeeListStore extends Store<CoffeeListStoreState>
    implements OnDestroy {
    private ngUnsubscribe$: Subject<undefined> = new Subject();
    private reloadCandidates$: Subject<undefined> = new Subject();
    private storeRequestStateUpdater: StoreRequestStateUpdater;

    constructor(private endpoint: CoffeeListEndpoint) {
        super(new CoffeeListStoreState());
    }

    init(): void {
        this.initReloadCandidates$();
        this.reloadCandidates();

        this.storeRequestStateUpdater = endpointHelpers.getStoreRequestStateUpdater(
            this
        );
    }

    ...

    reloadCandidates(): void {
        this.reloadCandidates$.next();
    }

    ...

    private initReloadCandidates$(): void {
        this.reloadCandidates$
            .pipe(
                switchMap(() => {
                    return this.endpoint.listCandidates(
                        this.state.candidateList.sort,
                        this.storeRequestStateUpdater
                    );
                }),
                tap(candidates => {
                    this.setState({
                        ...this.state,
                        candidateList: {
                            ...this.state.candidateList,
                            candidates: candidates,
                        },
                    });
                }),
                retry(),
                takeUntil(this.ngUnsubscribe$)
            )
            .subscribe();
    }
}
Notice how endpoint.listCandidates is not called directly. This pattern is used to make sure we’ll always update the state with data from endpoint’s last response if multiple reload candidates requests are initiated at roughly the same time.
When we want to reload the list of candidates we push a new value (undefined) into store.reloadCandidates$ stream. This triggers execution of pipeable operators. Inside switchMap we create a new request and switchMap replaces previous pending request (if present) with this newly created request. The rest of pipeable operators are only executed when the last request is finished. The state is then updated with the most recent data returned from the endpoint. If a request to the endpoint is not successful the retry operator is used to resubscribe to store.reloadCandidates$ observable (otherwise the stream would complete and no further reloads could be triggered by pushing new values into store.reloadCandidates$).
Lets now have a look at how endpoint.listCandidates is implemented.
1
2
3
4
5
6
7
8
9
10
11
12
13
14
15
16
17
18
19
20
21
22
23
24
25
26
27
28
29
30
31
32
33
34
@Injectable()
export class CoffeeListEndpoint {
    constructor(private http: HttpClient) {}

    listCandidates(
        sort: Sort,
        requestStateUpdater: StoreRequestStateUpdater
    ): Observable<Candidate[]> {
        const request = COFFEE_LIST_CONFIG.requests.listCandidates;
        const options = {
            params: {
                ...sortHelpers.convertSortToRequestParams(sort),
            },
        };
        requestStateUpdater(request.name, {inProgress: true});
        return this.http
            .get<ApiResponse<Candidate[]>>(request.url, options)
            .pipe(
                map(response => {
                    requestStateUpdater(request.name, {inProgress: false});
                    return response.data;
                }),
                catchError((error: HttpErrorResponse) => {
                    requestStateUpdater(request.name, {
                        inProgress: false,
                        error: true,
                    });
                    return throwError(error);
                })
            );
    }

    ...
}
In essence, endpoint constructs request parameters and executes HTTP request via Angular’s HttpClient. One part that needs some more context are the calls to requestStateUpdater.
requestStateUpdater: StoreRequestStateUpdater is a function used to update request state in the store. Endpoint from the example above uses it to update the state of a request to inProgress or error. Stores use endpointHelpers.getStoreRequestStateUpdater in order to generate the default StoreRequestStateUpdater.
1
2
3
4
5
6
7
8
9
10
11
12
13
export function getStoreRequestStateUpdater(
    store: any,
): StoreRequestStateUpdater {
    return (requestName, requestState) => {
        store.setState({
            ...store.state,
            requests: {
                ...store.state.requests,
                [requestName]: requestState,
            },
        });
    };
}
Sometimes a more flexible way of updating request state is required. In these cases requestStateUpdater: CustomRequestStateUpdater can be passed to the endpoint.
For example, calling the getUpdateCandidateRequestStateUpdater in CoffeeListStore generates such custom request state updater:
1
2
3
4
5
6
7
8
9
10
11
12
13
14
15
16
17
18
19
20
21
22
...

private getUpdateCandidateRequestStateUpdater(
    candidate: Candidate
): CustomRequestStateUpdater {
    return requestState => {
        this.setState({
            ...this.state,
            candidateList: {
                ...this.state.candidateList,
                candidates: this.state.candidateList.candidates.map(c => {
                    if (c.id === candidate.id) {
                        return {...c, updateRequest: requestState};
                    }
                    return c;
                }),
            },
        });
    };
}

...
This custom request state updater is used to update the candidate’s updateRequest property with request state passed in via requestState argument.
This concludes the first part where we explored main concepts and ideas used to create a scalable app architecture. We learned about state management with observable stores, presentational and smart container components, one-way data flow and communication with external systems.
In the next part we’ll dive into less theoretical stuff. I’ll present how to lay out an app’s directory structure and how to organize your source files so that you’ll know exactly where to put different parts that make up your app.
2. Modules
The concept of scalable Angular architecture presented in this article is based on dividing an app into different modules. At the root level this division looks like this:
app/
├── core/
├── features/
├── layout/
├── shared/
├── styles/
├── testing/
├── views/
└── ...
In this part of the article we’ll define the role of each one of these modules and explore their inner workings and structure. Their structure is very similar in order to keep the burden of complexity out of the way while programming, allowing you to focus on the things that matter like specific business logic and good user experience.
2.1 App’s root
At the root of the app there are the following files whose main purpose is to tie everything together into a nicely working app:
app/
├── ... (app's other modules)
├── app-initialization.module.ts
├── app-routing.module.ts
├── app.component.html
├── app.component.scss
├── app.component.ts
├── app.config.ts
├── app.constants.ts
└── app.module.ts
AppModule is app’s root module. It imports other modules and declares AppComponent.
AppComponent is app’s main component. It is app’s “shell” component and usually includes a <router-outlet> directive into which Angular router renders other components.
AppRoutingModule is the main routing module. It initializes Angular router with top-level Routes config. Other routes are defined in features’ routing modules - more about this later.
AppInitializationModule makes use of Angular’s APP_INITIALIZER injection token to do some work during Angular initialization process. This is useful for loading app’s settings from a server since the code is executed before rendering anything. Note that your app won’t start until all promises are resolved so doing too much work during initialization might impact the performance of your app negatively. In many scenarios it is better to use route resolvers to load necessary data before rendering route’s component as this doesn’t delay app’s initialization.
Lastly, app.constants.ts is used to store global constants’ enums and app.config.ts is used to store global app’s configs like REST API base URL or some defaults.
2.2 Core module
Core module is dedicated to singleton providers (observable stores/services) provided in root injector. Only one instance is created for each one of these services in app’s “lifetime” between page reloads. These services contain business logic used by other core services or app’s features.
An example of such service would be the user core service which is responsible for holding the state of the logged-in user.
Core module’s directories and files are structured like this:
core/
├── core-service-example/
│   ├── helpers/ (pure helper functions grouped by related functionalities)
│   │   ├── example.helpers.ts
│   │   └── ...
│   ├── services/ (observable stores, endpoints, regular Angular services (providers) etc.)
│   │   ├── core-service-example-resolver.service.ts (data providers used by Angular router - see https://angular.io/api/router/Resolve)
│   │   ├── core-service-example.endpoint.ts
│   │   ├── core-service-example.store.state.ts
│   │   ├── core-service-example.store.ts
│   │   └── ...
│   ├── types/ (TypeScript types, interfaces and classes)
│   │   ├── type-example.ts
│   │   └── ...
│   ├── core-service-example.config.ts
│   └── (core-submodule-example.module.ts) (optional for larger core submodules)
├── another-core-service-example/
│   └── ... (same as above)
└── core.module.ts
Each core service or, in the case of larger core submodules, each submodule, should be specified in providers/imports lists in CoreModule:
1
2
3
4
5
@NgModule({
    imports: [CoreSubmoduleExampleModule],
    providers: [CoreServiceExampleStore, CoreServiceExampleEndpoint],
})
export class CoreModule {}
CoreModule is imported into AppModule so that all of its providers are added to app’s root injector.
2.3 Feature modules
Feature module is a module composed of related components, providers, types, constants, routing configs etc. All these components work together to implement an app’s feature. Their only concern should be this feature and they should care as little as possible about other parts of the app. This means that all of the connections to the “outside world” are made from features’ services to services in CoreModule or by features’ views synching query params’ state with state in features’ stores.
A feature should never communicate with other features directly - this communications should be supported via services in CoreModules. By adhering to this rule we prevent creating direct dependencies/tight coupling between features. We should be able to remove any non-core feature from our app without breaking other app’s features.
Feature modules live inside app/features/ directory, each module in its own subdirectory, with a structure like this:
features/
├── feature-example/
│   ├── components/ (presentational components)
│   │   ├── component-example/
│   │   │   ├── component-example.component.html
│   │   │   ├── component-example.component.scss
│   │   │   ├── component-example.component.ts
│   │   │   └── private-type-example.ts (TypeScript type used by this presentational component only)
│   │   └── ...
│   ├── containers/ (container components that CAN'T be routed to, usually used by views to compose more complex interfaces)
│   │   ├── container-example/
│   │   │   ├── container-example.container.html
│   │   │   ├── container-example.container.scss
│   │   │   └── container-example.container.ts
│   │   └── ...
│   ├── helpers/ (pure helper functions grouped by related functionalities)
│   │   ├── example.helpers.ts
│   │   └── ...
│   ├── services/ (observable stores, endpoints, regular Angular services (providers) etc.)
│   │   ├── feature-example.endpoint.ts
│   │   ├── feature-example.store.state.ts
│   │   ├── feature-example.store.ts
│   │   └── ...
│   ├── types/ (TypeScript types, interfaces and classes)
│   │   ├── type-example.ts
│   │   └── ...
│   ├── views/ (container components that CAN be routed to)
│   │   ├── view-example/
│   │   │   ├── view-example.view.html
│   │   │   ├── view-example.view.scss
│   │   │   └── view-example.view.ts
│   │   └── ...
│   ├── feature-example-routing.module.ts
│   ├── feature-example.configs.ts
│   ├── feature-example.constants.ts
│   └── feature-example.module.ts
└── another-feature-example/
    └── ... (same as above)
Most of the structure should be understandable if you read the comments in the snippet above and the first part of this article.
At this point I would like to touch very quickly just on the files at the root of the feature module.
FeatureExampleModule is the definition of the feature module. It imports FeatureExampleRoutingModule and other app’s modules needed by the feature. It also declares components implemented by the feature. FeatureExampleModule can be imported directly into AppModule or it can be lazy loaded by Angular router.
FeatureExampleRoutingModule contains route definitions introduced by the feature, for example:
1
2
3
4
5
6
7
8
9
10
11
12
13
14
15
16
17
18
19
20
const routes: Routes = [{
    path: 'feature',
    children: [
        {
            path: '', // Default view for this feature accessible at /feature
            component: FirstExampleView,
        },
        {
            path: 'second', // Another view for this feature accessible at /feature/second
            component: SecondExampleView,
        },
        ...
   ]
}];

@NgModule({
    imports: [RouterModule.forChild(routes)],
    exports: [RouterModule],
})
export class CoffeeListRoutingModule {}
There should be a route definition specifying path for every view component inside views directory. In larger applications it is usually a good idea create a URL “namespace” assigned to feature’s route definitions by using componentless routes.
At last, feature’s constants and configs store feature specific constants’ enums and configs, similarly to global app’s constants and configs.
2.4 Shared module
SharedModule is a place to store all the reusable presentational components, directives, pipes, helpers and types used by features to create their UI. No component, directive or anything else from SharedModule should depend on any other module, component, provider etc. There should be no business logic implemented by the members of SharedModule. You should think about SharedModule as of a private node_modules collection of reusable functionalities.
Shared module’s directories and files are structured like this:
shared/
├── components/
│   ├── complex-component-example/ (larger and more complex reusable components with many sub-components)
│   │   ├── components/
│   │   │   ├── simple-component-example/
│   │   │   │   ├── component-example.component.html
│   │   │   │   ├── component-example.component.scss
│   │   │   │   ├── component-example.component.ts
│   │   │   │   └── private-type-example.ts
│   │   │   └── ...
│   │   ├── types/
│   │   │   ├── type-example.ts
│   │   │   └── ...
│   │   ├── complex-component-example.component.html
│   │   ├── complex-component-example.component.scss
│   │   ├── complex-component-example.component.ts
│   │   └── complex-component-example.module.ts
│   ├── simple-component-example/
│   │   ├── component-example.component.html
│   │   ├── component-example.component.scss
│   │   ├── component-example.component.ts
│   │   └── private-type-example.ts
│   └── ...
├── directives/
│   ├── directive-example.directive.ts
│   └── ...
├── helpers/
│   ├── example.helpers.ts
│   └── ...
├── pipes/
│   ├── pipe-example.pipe.ts
│   └── ...
├── types/
│   ├── type-example.ts
│   └── ...
└── shared.module.ts
2.5 Layout module
Layout module is a place where I recommend putting the components like header and footer used to create basic app layout. These components are usually rendered in the UI at all times and are often included directly into root AppComponent:
1
2
3
4
5
<ce-header class="ce-header"></ce-header>

<div class="ce-view-container">
    <router-outlet></router-outlet>
</div>
Directory structure of the layout module is not too complicated:
layout/
├── footer/
│   ├── footer.component.html
│   ├── footer.component.scss
│   └── footer.component.ts
├── header/
│   ├── header.component.html
│   ├── header.component.scss
│   └── header.component.ts
└── layout.module.ts
2.6 Views module
Views module is another module that usually turns out to be quite simple. It holds the views that are not a part of any feature and whose routing paths are defined in AppRoutingModule. An example of such a view is a 404 page (PageNotFoundView).
1
2
3
4
5
6
7
8
const appRoutes: Routes = [
    {
        path: '',
        redirectTo: coffeeListRoutingPaths.coffeeList,
        pathMatch: 'full',
    },
    {path: '**', component: PageNotFoundView},
];
Views module’s directory structure is the following:
views/
├── page-not-found/
│   ├── page-not-found.component.html
│   ├── page-not-found.component.scss
│   └── page-not-found.component.ts
└── views.module.ts
2.7 Styles
Directory styles/ at app’s root is not exactly holding a styles module. It is used to store all the files with app’s global styles definitions. I won’t go into details here as CSS architecture is a topic for an article on its own.
3. Testing
If there’s one thing you SHOULDN’T remember from this article is the lack of unit tests. I allowed myself to omit them in the Coffee Election example app for clarity since directory structure snippets would get even more verbose. I would not allow myself to do such a thing in a production app! 🧐
In general I find it best to put the test/spec files right next to files containing the implementation of components, services and other code under test. For example, I would put the test suite to test the CoffeeListStore in the same directory features/coffee-list/services where the store is located and use the .spec.ts suffix to indicate the file contains unit tests:
features/coffee-list/services/
├── coffee-list.store.ts
└── coffee-list.store.spec.ts
A lot of the times unit testing requires us to mock/stub certain building blocks of the app. I like to put these stubs in testing/ directory at the root of the app (where all other modules like core and features are located) and use the .stub.ts suffix to indicate a file containing mocked/stubbed component or service:
testing/
├── component-example.component.stub.ts
└── service-example.service.stub.ts
As the content of this testing directory expands it becomes useful to organize stub files into more subdirectories.
There’s a lot more to be written about testing but since this article is already quite lengthy I’ll draw the line at this point. If you are interested in how to unit test the observable store services used for state management in the architecture described in this article you can learn more by checking out my previous post about observable stores. I would also suggest you check out the official Angular documentation to learn more about testing of Angular apps.
4. Conclusion
We covered a lot of ground in this article. First we explored the concepts I find very useful when developing front-end applications like component based architecture and one-way data flow. If you remember just one thing from the first part, let it be this: you should divide your app into smart and presentational components.
In the second part I laid out an app architecture which I hope will provide some guidance when you’ll find yourself wondering where to put a specific component, service or some other building block in your apps. This architecture is by no means the ultimate silver bullet, but I find it to be good enough to support development of production ready, robust and scalable front-end applications.
If you find the content I produce helpful you can support my efforts by buying me a coffee or by tipping me via Brave Rewards program. Thank you!

Also, let's connect on Twitter (I have no product to push on you and my feed stays clean and interesting 😇).